

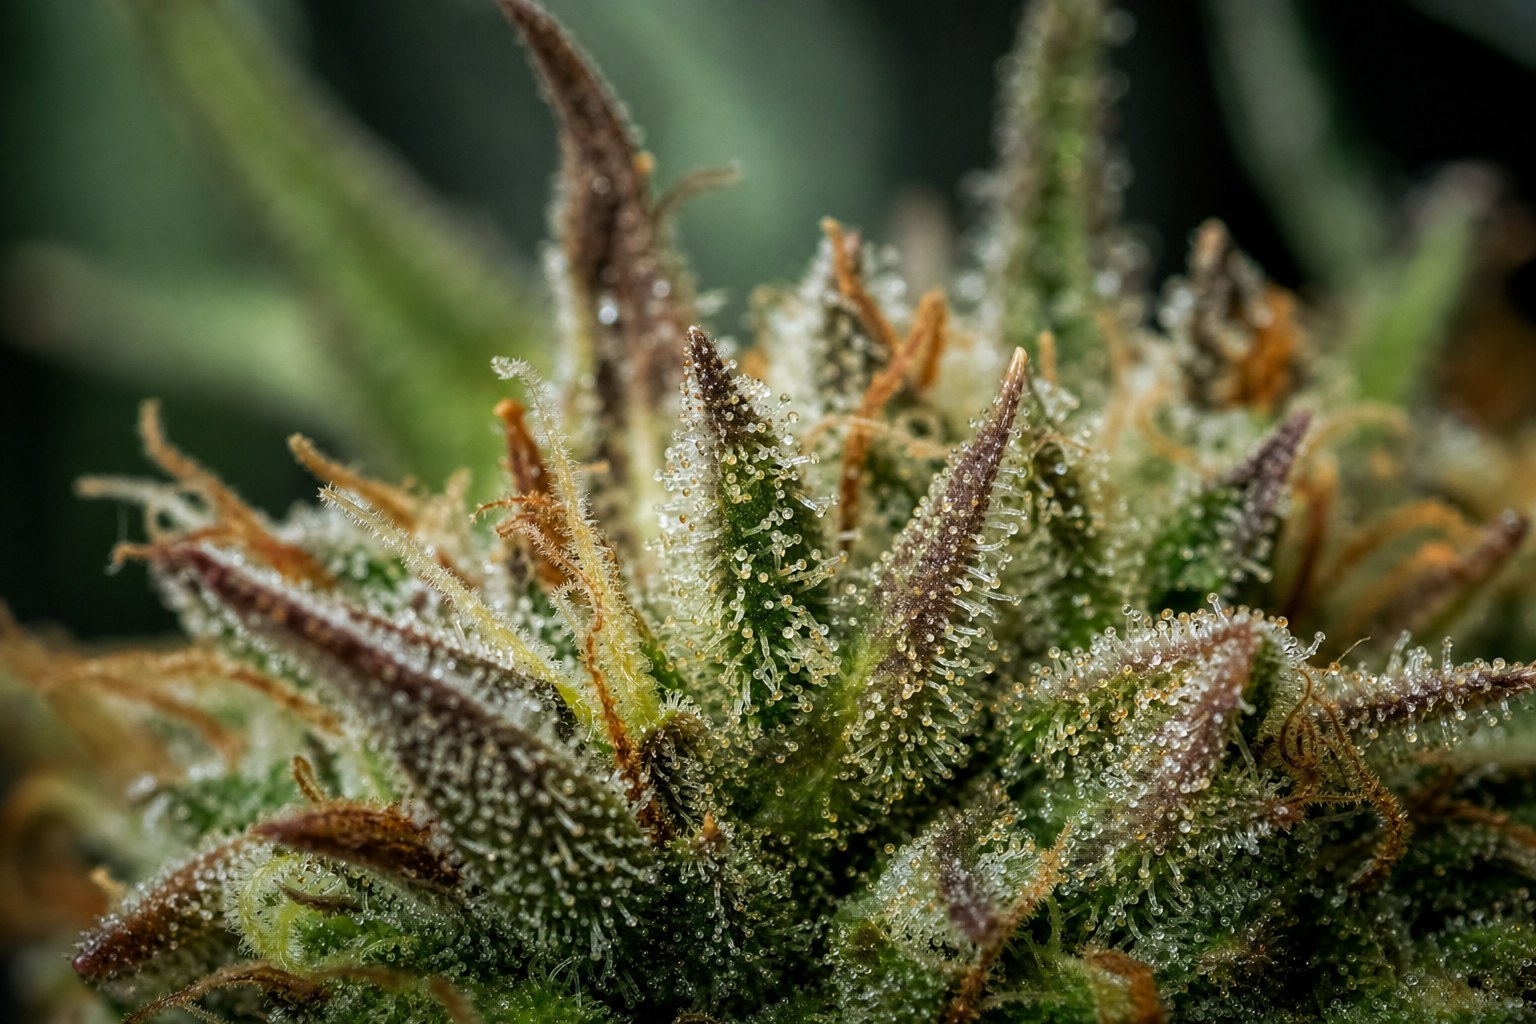
The best answer to when to harvest cannabis trichomes is when most flower trichomes have changed from clear to cloudy, with the desired proportion beginning to turn amber. Use a clean loupe, inspect several mature flowers rather than sugar leaves, and combine trichome colour with whole-plant signs, cultivar timing and New Zealand autumn weather.
Key takeaways
- Inspect flower trichomes: Sugar-leaf trichomes often change colour earlier and can give a misleading impression of overall readiness.
- Check several locations: Compare flowers from the upper, middle and lower canopy rather than relying on one prominent top.
- Use neutral light: White daylight or a neutral LED makes clear, cloudy and amber heads easier to distinguish.
- Look for a broad pattern: A single amber trichome is less informative than the overall balance across representative flowers.
- Consider the whole plant: Flower development, pistils, aroma, fading foliage and cultivar timing provide useful supporting context.
- Watch autumn conditions: Rain, humidity, cold nights and coastal moisture may influence practical harvest planning in New Zealand.
When to harvest cannabis: trichomes at a glance
Trichomes are tiny resin-bearing structures found across cannabis flowers and nearby leaves. Under magnification, the stalked glandular trichomes commonly used for harvest assessment look like miniature stems topped with rounded heads. Those heads generally progress from glassy and transparent to milky or cloudy, then towards amber as the flower ages.
For many growers, a predominantly cloudy appearance is the central harvest-readiness marker. Some amber heads can indicate that natural ageing is advancing, while large numbers of clear heads generally suggest that the inspected flower is still developing. These colours do not provide an exact measurement of potency, quality or likely effects. They are visual cues that should be interpreted alongside the cultivar, plant health, environment and stage of flowering.
Trichome development rarely occurs at precisely the same rate over an entire plant. Upper flowers exposed to stronger light may look different from shaded flowers lower down. One side of an outdoor plant may also mature ahead of the other because it receives more direct sun or airflow. Harvest timing is therefore a judgement based on a representative sample, not a single close-up.
Before checking trichomes in New Zealand autumn
Outdoor photoperiod plants commonly approach harvest during autumn, but the exact window varies with latitude, cultivar, planting date and seasonal conditions. A calendar estimate is useful for planning, yet the plant itself offers more relevant information as harvest approaches. Begin regular loupe checks before the expected window so changes can be followed over several days rather than assessed in a rush.
Follow local laws and assess the whole plant
Before growing or harvesting cannabis, check the rules that apply to your location and circumstances. Requirements can change, and assumptions based on overseas information may not reflect New Zealand law. Kiwi Seed Bank’s overview of cannabis cultivation law in New Zealand provides general orientation, but growers remain responsible for confirming current official requirements.
Next, stand back and examine the whole plant. Mature flowers often appear swollen, pistils may have darkened and drawn inward, and the plant may show normal late-season fading. Aroma may become more pronounced. None of these features is decisive alone, and browned pistils can also result from wind, handling or environmental stress. Use them as context for what the loupe reveals.
Inspect flower condition as well. New Zealand autumn can bring damp mornings, heavy dew and prolonged rain. Look within dense flowers for discolouration, collapsed tissue, unusual softness or a musty smell. If suspicious material is found, keep it separate from sound flowers and clean tools before moving to another plant. Good airflow and careful handling help reduce risk during humid weather.
Choose a clean loupe and steady lighting
A handheld jeweller’s loupe offering about 30x to 60x magnification is usually suitable. Lower magnification makes it easier to locate the area, while stronger magnification can make colour differences clearer. A clip-on phone macro lens or small digital microscope may also work, although screen colour and automatic image processing can alter the appearance.
Clean the lens before every session. Resin smears, dust and fingerprints scatter light and can make transparent heads appear cloudy. Use the cleaning method recommended for the device, and avoid touching flowers with the lens. If several plants are being inspected, clean hands and equipment between plants.
Stability matters as much as magnification. Brace the hand holding the loupe against a stake, branch support or the other hand. Bring the loupe close to the eye, then slowly move towards the flower until the trichomes come into focus. Avoid squeezing the flower, because damaged trichome heads are difficult to classify.
How to inspect cannabis trichomes with a loupe
Choose a dry part of the day when surface moisture has lifted. Select a mature flower, steady it gently by supporting the branch, and focus on the calyx surfaces between the pistils. Scan several small areas rather than concentrating on the first sharp image. Note the approximate balance of clear, cloudy and amber heads.
Repeat the process on flowers from different heights and sides of the plant. Written notes or photographs taken in consistent light can help track change. Labels should include the date, plant and canopy position. Comparing observations every two or three days is generally more useful than checking repeatedly within one day.
Check the flower rather than the sugar leaves
Sugar leaves are the small resinous leaves protruding from the flowers. Their trichomes are easy to view, which makes them tempting inspection targets. However, leaf trichomes may turn cloudy or amber ahead of those on the flower itself, particularly where leaves receive intense light or weather exposure.
Focus on the rounded floral structures from which the pistils emerge. Move the loupe slightly around each selected flower to view trichomes on more than one surface. If leaves block the view, change the viewing angle instead of pulling at the flower. The aim is to observe intact heads on representative floral tissue.
Sample several flowers across the plant
Start with one or two flowers near the upper canopy, then examine flowers in the middle and lower sections. Include both the sunnier and more sheltered sides of an outdoor plant. For an indoor plant, compare areas directly beneath the light with those near the canopy edge.
If upper flowers are substantially further along, a staged harvest may be considered where local rules and circumstances permit. This involves taking mature sections first and allowing less-developed flowers additional time. It adds handling and environmental demands, so it is not automatically the right choice. A single harvest based on the overall plant may be simpler.
Do not base the decision on one unusually amber patch. Localised amber can result from physical contact, intense light, heat or natural variation. A repeated pattern across several flower sites carries more weight than an isolated cluster.
Avoid judging under coloured grow lights
Purple, red-heavy or blue-heavy grow lighting changes how trichome colours appear. Switch to a neutral white inspection light where possible, following safe procedures for the growing space and equipment. Outdoors, bright indirect daylight gives a useful view without the harsh reflections produced by direct midday sun.
Keep the lighting method consistent between checks. A trichome photographed with a warm household bulb can look more amber than the same head under cool daylight. Phone cameras can also increase contrast, sharpen edges or adjust white balance automatically. Use photographs to record trends, but confirm colours directly through the loupe.
What clear, cloudy and amber trichomes indicate
Trichome colour is a continuum. Not every head fits neatly into one category, and a flower may show all three colours at once. Count broad proportions rather than trying to classify every trichome. For example, record whether the sample is mostly clear, mixed clear and cloudy, mostly cloudy, or mostly cloudy with a visible amber share.
Clear trichomes
Clear trichome heads look transparent, glossy or glass-like. Strong reflections can make them appear white at certain angles, so tilt the loupe or change the light position before deciding. When most intact flower trichomes remain clear, the flower generally appears to be in an earlier developmental stage.
Continue observing the plant and compare the same canopy zones after several days. Late-season changes may progress unevenly, particularly during cool weather. Avoid relying solely on an estimated flowering duration printed for a cultivar, as real plants respond to their environment.
Cloudy trichomes
Cloudy trichomes look opaque, milky or frosted through the head rather than merely reflecting a white highlight. When most flower trichomes are cloudy, many growers regard the plant as being within its likely harvest window. The appropriate day still depends on the desired maturity profile, overall flower condition and forecast weather.
Check that cloudy heads are intact. A missing or damaged head can leave a pale stalk that is easily misread. Dust, foliar residue and dried water spots can also create a whitish appearance. Clean optics and inspection of several areas help separate genuine cloudiness from surface interference.
Amber trichomes
Amber heads range from pale honey to deeper orange-brown. A modest amber proportion among predominantly cloudy flower trichomes shows that natural ageing is becoming more visible. As time passes, the amber share may increase, but its rate and distribution vary considerably.
A loupe cannot reliably predict potency, flavour or effects from colour alone. Different cultivars may display different proportions at comparable maturity, and some may show limited amber even late in flowering. Light intensity, temperature, weather exposure, physical contact and flower position can all affect what is visible.
Watch for ageing cues elsewhere on the flower, including receding pistils and reduced fresh swelling. Distinguish normal colour progression from damaged tissue. Healthy amber trichome heads remain recognisable as individual resin glands; broad brown or grey areas within the flower call for a closer condition check rather than being counted as amber trichomes.
New Zealand autumn grow calendar and regional notes
Early autumn
Review cultivar timing, prepare clean inspection tools and begin baseline checks. Outdoor plants may still be actively developing, especially in warmer northern areas. Keep an eye on shortening days, overnight humidity and the first sustained wet periods. The general New Zealand cannabis growing guide provides wider seasonal context.
Mid-autumn
Increase inspection frequency as cloudy trichomes become more common. Check weather forecasts, flower condition and airflow. In Auckland, Northland and other humid northern locations, moisture pressure can become a major practical factor. In exposed coastal districts, wind-driven rain and salt-laden air may affect outer flowers.
Late autumn
Cooler southern regions may face cold nights or frost while some flowers are still progressing. Canterbury, Otago and inland districts can experience sharp temperature swings. Wellington and other windy locations may dry quickly after rain but expose branches to physical stress. Regional conditions can justify harvesting within a suitable readiness range rather than waiting for an exact colour ratio.
Across all regions, inspect after severe weather and support heavy branches where necessary. Do not harvest wet flowers unless immediate plant condition makes delay impractical. If conditions allow, wait until surface moisture has evaporated and handle flowers gently to retain trichome heads.
Harvest-readiness checklist
- Confirm that the trichomes being viewed are on flower tissue rather than sugar leaves.
- Use a clean 30x to 60x loupe and neutral white lighting.
- Inspect upper, middle and lower flowers on more than one side of the plant.
- Look for a broad shift from clear towards mostly cloudy heads.
- Record whether amber heads appear consistently across representative flowers.
- Compare observations with flower swelling, pistil position and normal late-season fading.
- Check dense flowers for moisture-related damage or unusual odour.
- Review the short-term rain, humidity, wind and frost forecast.
- Prepare a clean, dark, ventilated space for the post-harvest drying stage.
- Record the harvest date and observations for future seasonal planning.
Once the chosen harvest window arrives, minimise rough handling and move cut branches promptly to the prepared drying area. Environmental stability after harvest matters, so organise hanging space, airflow monitoring and clean equipment beforehand rather than improvising after cutting.
Trichome colour is most useful as a pattern. Read several flowers, confirm the trend over time, and balance magnified detail with the condition of the whole plant and the realities of New Zealand autumn weather.
Written by the Kiwi Seed Bank grow team. For a focused reference during the final flowering weeks, revisit this guide to when to harvest cannabis by reading trichomes.